

-
Posts
133 -
Joined
-
Last visited
-
Days Won
10
Posts posted by midnightstreamer
-
-
Server API
in API
To successfully use the Server API, you have to insert your IP first into the whitelist. You can do that in General Settings -> API Settings.
You can pass api_key by POST or by appending the key as 4th segment of the URL.
Add New Reseller
To add a New reseller, we will call the following URL.
http(s)://domain:port/api/resellers/newREQUIRED PARAMETERS
- name
It will return a JSON Encoded string, with all information that you might want.
Example Code:
$panel_url = 'http://DOMAIN:PORT/';
$api_key = 'api_key';
$name = 'test_reseller';
$max_allowed_connections = X;
$use_credits = True;
$credits = X;

###############################################################################
$post_data = array('api_key' => $api_key,
		   'data' => array('name' => $name,
		   		   'max_allowed_connections' => $max_allowed_connections,
		   		   'use_credits' => $use_credits,
		   		   'credits' => $credits)
		   );

$opts = array( 'http' => array(
        'method' => 'POST',
        'header' => 'Content-type: application/x-www-form-urlencoded',
        'content' => http_build_query( $post_data ) ) );

$context = stream_context_create( $opts );
$api_result = json_decode( file_get_contents( $panel_url . "api/resellers/new", false, $context ), true );
Edit Reseller
To edit an existing reseller, we will call the following URL.
http(s)://domain:port/api/resellers/updateREQUIRED PARAMETERS
- id OR username
It will return a JSON Encoded string, with all information that you might want.
Example Code:
$panel_url = 'http://DOMAIN:PORT/';
$api_key = 'api_key';
$id = X;
$credits = X;

###############################################################################
$post_data = array( 'api_key' => $api_key, 'id' => $id, 'data' => array('credits' => $credits) );
$opts = array( 'http' => array(
        'method' => 'POST',
        'header' => 'Content-type: application/x-www-form-urlencoded',
        'content' => http_build_query( $post_data ) ) );

$context = stream_context_create( $opts );
$api_result = json_decode( file_get_contents( $panel_url . "api/resellers/update", false, $context ), true );
Add Credits to Reseller
To add credits to an existing reseller, we will call the following URL.
http(s)://domain:port/api/resellers/add_creditsREQUIRED PARAMETERS
- id OR username
- credits
It will return a JSON Encoded string, with all information that you might want.
Example Code:
$panel_url = 'http://DOMAIN:PORT/';
$api_key = 'api_key';
$id = X;
$credits = X;

###############################################################################
$post_data = array( 'api_key' => $api_key, 'id' => $id, 'credits' => $credits);
$opts = array( 'http' => array(
        'method' => 'POST',
        'header' => 'Content-type: application/x-www-form-urlencoded',
        'content' => http_build_query( $post_data ) ) );

$context = stream_context_create( $opts );
$api_result = json_decode( file_get_contents( $panel_url . "api/resellers/add_credits", false, $context ), true );
List Panel Resellers
Perform this request to view all resellers along with their email, username, group, reseller etc.
The URL we will call is
http(s)://domain:port/api/reseller/listREQUIRED PARAMETERS
- none
It will return a JSON Encoded string, with all information that you might want.
Example Code:
$panel_url = 'http://DOMAIN:PORT/';
$api_key = 'api_key';

###############################################################################
$post_data = array( 'api_key' => $api_key );
$opts = array( 'http' => array(
        'method' => 'POST',
        'header' => 'Content-type: application/x-www-form-urlencoded',
        'content' => http_build_query( $post_data ) ) );

$context = stream_context_create( $opts );
$api_result = json_decode( file_get_contents( $panel_url . "api/resellers/list", false, $context ), true );
-
Thanks for your suggestions! They will be included in the next release!
-
What language would you like to be added in the panel?
-
Player API
in API
Player API
Note: The API Does not provide Full links to the requested stream. You have to build the url to the stream in order to play it.
- For Live Streams the main format is
http(s)://domain:port/live/username/password/streamID.ext ( In allowed_output_formats element you have the available ext )
-
For VOD Streams the format is:
http(s)://domain:port/live/username/password/streamID.ext ( In target_container element you have the available ext )
On the First Authentication Call, you will get a list of some useful elements. If the server_protocol element is https you have to force all the API & Player Requests to be through https. The same Call, also provides the http(s) ports in case you need them as well as the domain name you should use.
The current datetime & timestamps are offered to you and can help you for time corrections for EPG & TV Archive.
If you want to limit the displayed output data, you can use offset / items per page / page number as the last three segments of the API call.
E.g. http(s)://domain:port/api/player/{username}/{password}/live/streams/4/20/7 (fetch streams for user {username} from the 4th stream on, 20 streams per page, fetch the 7th page)
It is highly recommended to fetch all data at once and cache them to your Application.Authentication
api/player/{username}/{password}
GET Live Stream Categoriesapi/player/{username}/{password}/live/categories
GET VOD Stream Categoriesapi/player/{username}/{password}/vod/categoriesGET Series Categories
api/player/{username}/{password}/series_cat (This will get All Series Categories)
api/player/{username}/{password}/series_cat/{category_id} (This will get All Series in the selected category ONLY)
GET LIVE Streams
api/player/{username}/{password}/live/streams (This will get All LIVE Streams)
api/player/{username}/{password}/live/streams/{category_id} (This will get All LIVE Streams in the selected category ONLY)
GET VOD Streamsapi/player/{username}/{password}/vod/streams (This will get All VOD Streams) api/player/{username}/{password}/vod/streams/{category_id} (This will get All VOD Streams in the selected category ONLY)GET Series Seasons and Episodes
api/player/{username}/{password}/series/seasons/{series_id} (This will get All Seasons of the selected series ONLY)
api/player/{username}/{password}/series/episodes/{series_id}/{season_number} (This will get All Episodes in the selected season of the selected series ONLY)
GET Catch-up
api/player/{username}/{password}/catchup/{stream_id} (This will get all catchup info for the choosen stream such as event name, start date, end timestamp, catchup URL and event description)
GET VOD Infoapi/player/{username}/{password}/vod/info/{vod_id} (This will get info such as video codecs, duration, description, directors for 1 VOD)GET Series Episode Info
api/player/{username}/{password}/series/info/{vod_id} (This will get info such as video codecs, duration, description, directors for 1 VOD)
GET short epg for LIVE Streams (same as stalker portal, prints the upcoming EPG events that will play next)api/player/{username}/{password}/epg/short/{stream_id} api/player/{username}/{password}/epg/short/{stream_id}/{offset}/{items_per_page}/{page_number} (You can specify a limit too appending offset/items_per_page/page_number to the URL)
GET ALL EPG for LIVE Streams (same as stalker portal, but it will print all EPG listings regardless of the day)api/player/{username}/{password}/epg/full/{stream_id}Full EPG List for all Streams
api/player/{username}/{password}/epg/full/allGet Archive URL
api/player/{username}/{password}/archive/create_link/{stream_id}/{epg_event_end}Get EPG Date TXT File
download/LastUpdate/{username}/{password}Get EPG Timestamp TXT File
download/LastUpdateTimestamp/{username}/{password}Get Line Messages
api/player/{username}/{password}/messagesSend Claims
api/player/{username}/{password}/send_claim/{stream_id}/{claim_type} (claim_type can be sound, video, no_epg, wrong_epg)Set Favorites for Live channels, VOD and Radio
api/player/{username}/{password}/set_fav/{live/vod/radio}/{service_1_id}/{service_2_id}/{service_3_id}/...Set Favorites for Series
api/player/{username}/{password}/set_fav/series/{series_1_id}/{series_2_id}/{series_3_id}/...Check Parent Password
api/player/{username}/{password}/check_parent_password/{password} (returns True or False)Change Parent Password
api/player/{username}/{password}/change_parent_password/{current_parent_password}/{new_parent_password} (returns False is current_parent_password is wrong)Get Speed Test URL
api/player/{username}/{password}/speed_testDownload arbitrary File located in folder /home/midnightstreamer/iptv_midnight_streamer/download
download/file/{username}/{password}/{file_name} -
You can download the official MidnightStreamer player for android in the download section of your CMS.
-
Hi Linnet!
-
Please make sure ports 7999 and the HTTPS port you have chosen (default 8001) are reachable from the internet.
-
Just fill in the TMDB API key in General Settings and the Series and VOD info will be pulled automatically on save.
You can get the TMDB API key at TMDB's official website.
If you have any difficulties please submit a ticket.
-
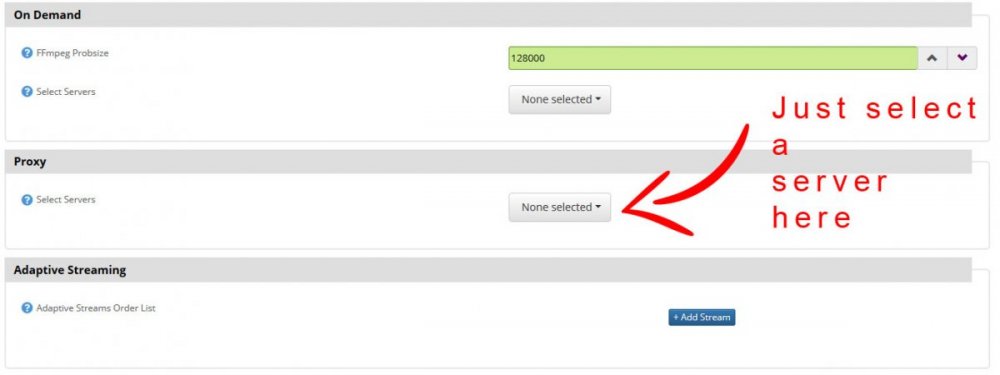
Hi TempleOS>_
Just select a server from the drop down menu in Stream Settings and the stream will be proxied in the selected server. If you have LBs you can choose more servers.
-
 1
1
-
-
You have to fill your regular EPG first. Fill up Channels Source File and EPG Source File in Live streams -> Manage EPG, then you will be able to copy/delay the inserted epg.
-
Server API
in API
To successfully use the Server API, you have to insert your IP first into the whitelist. You can do that in General Settings -> API Settings.
You can pass api_key by POST or by appending the key as 4th segment to the URL.
Getting Online Streams
To get online streams, we will call the following URL.
http(s)://domain:port/api/streams/online/{api_key}No POST action is required
Getting Offline Streams
To get offline streams, we will call the following URL.
http(s)://domain:port/api/streams/offline/{api_key}No POST action is required
Enabling / (Re)starting Streams
To enable/(re)start streams, we will call the following URL.
http(s)://domain:port/api/streams/start/{api_key}/{stream_1_id}/{stream_2_id}/{stream_3_id}/.../{stream_X_id}No POST action is required
Disabling / Stopping Streams
To disable/stop streams, we will call the following URL.
http(s)://domain:port/api/streams/stop/{api_key}/{stream_1_id}/{stream_2_id}/{stream_3_id}/.../{stream_X_id}No POST action is required
-
Server API
in API
To successfully use the Server API, you have to insert your IP first into the whitelist. You can do that in General Settings -> API Settings.
You can pass api_key by POST or by appending the key as 4th segment to the URL.
List Servers
Perform this request to view all your servers, main & load balancers including their status.
http(s)://domain:port/api/servers/list/{api_key}View the details of a single server with its ID.
http(s)://domain:port/api/servers/list/{api_key}/{server_id}No POST action is required
Editing Server
http(s)://domain:port/api/servers/updateREQUIRED PARAMETERS
- id
OPTIONAL PARAMETERS
- all other fields of servers database table
For example if we want to Edit a LB's IP and VPN IP we will do it like this:
<?php

$panel_url = 'http://DOMAIN:PORT/';
$api_key = 'api_key';
$id = 2;
$server_ip = 1.2.3.4;
$vpn_ip = 10.10.0.8;

###############################################################################
$post_data = array(
        'api_key' => $api_key,
        'id' => $id,
        'data' => array('server_ip' => $server_ip,
        		'vpn_ip' => $vpn_ip)
		       );

$opts = array( 'http' => array(
        'method' => 'POST',
        'header' => 'Content-type: application/x-www-form-urlencoded',
        'content' => http_build_query( $post_data ) ) );

$context = stream_context_create( $opts );
$api_result = json_decode( file_get_contents( $panel_url . "api/servers/update", false, $context ) );

?>
In the above example, we will edit the server_ip and vpn_ip for our LB with id 2 that already exists in our database.
Example(API Success)
{"result":true, "modified_id":{id}, "name":{name}, "IP address":{server_ip}}Example(API Failed)
{"result":false,"error":"Invalid IP address"} {"result":false,"error":"{Database error}"}-
Invalid IP address.
The provided IP is not a valid IP address -
{Database error}
Database error description. The DB error will be logged in LOGS -> Panel Error Log.
-
Server API
in API
To successfully use the Server API, you have to insert your IP first into the whitelist. You can do that in General Settings -> API Settings.
You can pass api_key by POST or by appending the key as 4th segment to the URL.
Add New Administrator
To add a New administrator, we will call the following URL.
http(s)://domain:port/api/administrators/newREQUIRED PARAMETERS
- username
- password
- group_id
It will return a JSON Encoded string, with all information that you might want.
Example Code:
$panel_url = 'http://DOMAIN:PORT/';
$api_key = 'api_key';
$username = 'test_username';
$password = 'test_password';
$email = '[email protected]';
$group_id = X;

###############################################################################
$post_data = array('api_key' => $api_key,
		   'data' => array('username' => $username,
		   		   'password' => $password,
		   		   'email' => $email,
		   		   'group_id' => $group_id)
		   );

$opts = array( 'http' => array(
        'method' => 'POST',
        'header' => 'Content-type: application/x-www-form-urlencoded',
        'content' => http_build_query( $post_data ) ) );

$context = stream_context_create( $opts );
$api_result = json_decode( file_get_contents( $panel_url . "api/administrators/new", false, $context ), true );
Edit Administrator
To edit an existing user, we will call the following URL.
http(s)://domain:port/api/administrators/updateREQUIRED PARAMETERS
- id OR username
It will return a JSON Encoded string, with all information that you might want.
Example Code:
$panel_url = 'http://DOMAIN:PORT/';
$api_key = 'api_key';
$id = X;
$email = '[email protected]';

###############################################################################
$post_data = array( 'api_key' => $api_key, 'id' => $id, 'data' => array('email' => $email) );
$opts = array( 'http' => array(
        'method' => 'POST',
        'header' => 'Content-type: application/x-www-form-urlencoded',
        'content' => http_build_query( $post_data ) ) );

$context = stream_context_create( $opts );
$api_result = json_decode( file_get_contents( $panel_url . "api/administrators/update", false, $context ), true );
List Panel Administrators
Perform this request to view all administrators along with their email, username, group, reseller etc.
The URL we will call is
http(s)://domain:port/api/administrators/listREQUIRED PARAMETERS
- none
It will return a JSON Encoded string, with all information that you might want.
Example Code:
$panel_url = 'http://DOMAIN:PORT/';
$api_key = 'api_key';

###############################################################################
$post_data = array( 'api_key' => $api_key );
$opts = array( 'http' => array(
        'method' => 'POST',
        'header' => 'Content-type: application/x-www-form-urlencoded',
        'content' => http_build_query( $post_data ) ) );

$context = stream_context_create( $opts );
$api_result = json_decode( file_get_contents( $panel_url . "api/administrators/list", false, $context ), true );
-
Server API
in API
To successfully use the Server API, you have to insert your IP first into the whitelist. You can do that in General Settings -> API Settings.
You can pass api_key by POST or by appending the key as 4th segment to the URL.
Create/Edit & View Information on MAG Devices
The procedure is almost the same as creating/editing & view info on a user line. The only difference is that instead of calling the user action, we will the stb action. Instead of username we will just pass the mac_address parameter.
Example API Call To Create New MAG
http(s)://domain:port/api/mag/newREQUIRED PARAMETERS
- mac_address
<?php

$panel_url = 'http://DOMAIN:PORT/';
$api_key = 'api_key';
$mac_address = '00:1A:79:79:79:79';
$subscription_plan = 1;
$expire_date = strtotime( "+1 month" );

###############################################################################
$post_data = array(
        'api_key' => $api_key,
        'data' => array('mac_address' => $mac_address,
        		'expire_date' => $expire_date,
        		'subscription_plan_id' => $subscription_plan)
		  );

$opts = array( 'http' => array(
        'method' => 'POST',
        'header' => 'Content-type: application/x-www-form-urlencoded',
        'content' => http_build_query( $post_data ) ) );

$context = stream_context_create( $opts );
$api_result = json_decode( file_get_contents( $panel_url . "api/mag/new", false, $context ) );
print_r($api_result);

?>
Example(API Success)
{"result":true}Example(API Failed)
{"result":false,"error":"MAC Address already exists"} {"result":false,"error":"{Database error}"}-
MAC Address already exists
The MAC already exists in the database -
{Database error}
Database error description. The DB error will be logged in LOGS -> Panel Error Log.
Example API Call To Edit a MAG Device
http(s)://domain:port/api/mag/updateREQUIRED PARAMETERS
- mac_address
<?php

$panel_url = 'http://DOMAIN:PORT/';
$api_key = 'api_key';
$mac_address = '00:1A:79:79:79:79';
$subscription_plan = 1;
$expire_date = strtotime( "+1 month" );

###############################################################################
$post_data = array(
	'api_key' => $api_key,
	'mac_address' => $mac_address,
	'data' => array('expire_date' => $expire_date,
			'subscription_plan_id' => $subscription_plan)
		);

$opts = array( 'http' => array(
        'method' => 'POST',
        'header' => 'Content-type: application/x-www-form-urlencoded',
        'content' => http_build_query( $post_data ) ) );

$context = stream_context_create( $opts );
$api_result = json_decode( file_get_contents( $panel_url . "api/mag/update", false, $context ) );
?>
Example(API Success)
{"result":true}Example(API Failed)
{"result":false,"error":"Invalid MAC Address"} {"result":false,"error":"{Database error}"}-
Invalid MAC Address
Invalid MAC Address format used -
{Database error}
Database error description. The DB error will be logged in LOGS -> Panel Error Log.
Example API Call To Delete a MAG Device
With this API call you can delete the MAG device from the database.
The URL we will call is
http(s)://domain:port/api/mag/deleteREQUIRED PARAMETERS
- mac_address
View Information MAG Device
http(s)://domain:port/api/mag/infoREQUIRED PARAMETERS
- mac_address
It will return a JSON Encoded string, with all information that you might want.
Example Code:
<?php

$panel_url = 'http://DOMAIN:PORT/';
$api_key = 'api_key';
$mac_address = '00:1A:79:79:79:79';

###############################################################################
$post_data = array( 'api_key' => $api_key, 'mac_address' => $mac_address);
$opts = array( 'http' => array(
        'method' => 'POST',
        'header' => 'Content-type: application/x-www-form-urlencoded',
        'content' => http_build_query( $post_data ) ) );

$context = stream_context_create( $opts );
$api_result = json_decode( file_get_contents( $panel_url . "api/mag/info", false, $context ), true );


if ( $api_result['result'] )
{
    echo "MAG Connections: " . json_encode($api_result['mag_conn_info']);
    echo "\nCurrent Expire Date: " . ( ( empty( $api_result['mag_info']['expire_date'] ) ) ? 'Unlimited' : $api_result['mag_info']['expire_date'] );
    echo "\nMax Connections: " . $api_result['mag_info']['max_allowed_connections'];
    echo "\nAvailable Channel IDs: " . implode( ',', $api_result['mag_channel_ids'] );
}
else
    echo 'FAILED';

?>
-
Server API
in API
To successfully use the Server API, you have to insert your IP first into the whitelist. You can do that in General Settings -> API Settings.
You can pass api_key by POST or by appending the key as 4th segment to the URL.
Creating New Line
To create a New line, we will call the following URL.
http(s)://domain:port/api/line/newThe above URL, accepts the POST action
Example Code:
<?php

$panel_url = 'http://DOMAIN:PORT/';
$api_key = 'api_key';
$username = 'test_username';
$password = 'test_password';
$max_connections = 1;
$restreamer = 1;
$subscription_plan = 1;
$expire_date = strtotime( "+1 month" );

###############################################################################
$post_data = array('api_key' => $api_key,
        	   'data' => array('username' => $username,
				  'password' => $password,
        			  'max_allowed_connections' => $max_connections,
        			  'restreamer' => $restreamer,
        			  'expire_date' => $expire_date,
        			  'subscription_plan_id' => $subscription_plan)
		  );

$opts = array( 'http' => array(
        'method' => 'POST',
        'header' => 'Content-type: application/x-www-form-urlencoded',
        'content' => http_build_query( $post_data ) ) );

$context = stream_context_create( $opts );
$api_result = json_decode( file_get_contents( $panel_url . "api/line/new", false, $context ) );

?>
If you leave the username and/or password elements empty, the system will generate random characters for these 2 fields. In addition, leaving any field empty, api will use the default value for this field according to SQL Database. So theoretically, you can make a line with just Calling the Above URL, without any parameter, however the created user, wont have any bouquets inside.
You can call any other element that is in the database like
- reseller_id
- disabled
- allowed_ips
- allowed_user_agents
- server_id
- isp_lock
- notes
- and so on...
If you want to set the allowed_ips/allowed_user_agents or other multiple values you can use arrays.
The API will return a simple json encoded string that upon decoding will contain the element result which returns true/false.
Example(API Success)
{"result":true,"created_id":14838,"username":"d4PSc7uCqF","password":"2ZiSRRZk4b"}The API returned as the username/password of the NEW line, as well as the ID so we can use it wherever we want.
Example(API Failed)
{"result":false,"error":"Username exists."} {"result":false,"error":"{Database error}"}-
Username exists.
The Username you specified already exists in the database -
{Database error}
Database error description. The DB error will be logged in LOGS -> Panel Error Log.
Editing Line
Editing a line is very similar to the above. The URL we will call this time is
http(s)://domain:port/api/line/updateREQUIRED PARAMETERS
- username
OPTIONAL PARAMETERS
- all other fields of lines database table
For example if we want to Edit the Expire Date, make the line restreamer and adjusting the max connections to 10 we will do it like this:
<?php

$panel_url = 'http://DOMAIN:PORT/';
$api_key = 'api_key';
$username = 'test_username';
$password = 'test_password';
$max_connections = 10;
$restreamer = 1;
$expire_date = strtotime( "+1 month" ); //from the time now, not from line's expire date.

###############################################################################
$post_data = array(
        'api_key' => $api_key,
        'username' => $username,
        'data' => array('password' => $password,
        		'max_allowed_connections' => $max_connections,
        		'restreamer' => $restreamer,
        		'expire_date' => $expire_date)
		       );

$opts = array( 'http' => array(
        'method' => 'POST',
        'header' => 'Content-type: application/x-www-form-urlencoded',
        'content' => http_build_query( $post_data ) ) );

$context = stream_context_create( $opts );
$api_result = json_decode( file_get_contents( $panel_url . "api/line/update", false, $context ) );

?>
In the above example, we will edit the max_allowed_connections, restreamer and expire_date for our line with username test_username, and password test_password that already exists in our database.
Example(API Success)
{"result":true, "modified_id":{id}, "username":{username}, "password":{password}}Example(API Failed)
{"result":false,"error":"Wrong Username/Password."} {"result":false,"error":"{Database error}"}-
Wrong Username/Password.
The Username / Password you specified don't exist in the database -
{Database error}
Database error description. The DB error will be logged in LOGS -> Panel Error Log.
Deleting Line
With this API call you can delete the line from the database.
The URL we will call is
http(s)://domain:port/api/line/deleteREQUIRED PARAMETERS
- username
View Line Information
With this API call, we will get all the information available about our line including the active connections.
The URL we will call this time is
http(s)://domain:port/api/line/infoREQUIRED PARAMETERS
- username
It will return a JSON Encoded string, with all information that you might want.
Example Code:
$panel_url = 'http://DOMAIN:PORT/';
$api_key = "api_key";
$username = "username";
$password = "password";

###############################################################################
$post_data = array( 'api_key' => $api_key, 'username' => $username );
$opts = array( 'http' => array(
        'method' => 'POST',
        'header' => 'Content-type: application/x-www-form-urlencoded',
        'content' => http_build_query( $post_data ) ) );

$context = stream_context_create( $opts );
$api_result = json_decode( file_get_contents( $panel_url . "api/line/info", false, $context ), true );

if ( $api_result['result'] )
{
    echo "Line Connections: " . json_encode($api_result['line_conn_info']);
    echo "\nCurrent Expire Date: " . (( empty( $api_result['line_info']['expire_date'] ) ) ? 'Unlimited' : $api_result['line_info']['expire_date'] );
    echo "\nMax Connections: " . $api_result['line_info']['max_allowed_connections'];
    echo "\nAvailable Channel IDs: " . implode( ',', $api_result['line_channel_ids'] );
}
else
    echo 'FAILED';

Hooks
in API
Posted
Hooks are used to customize the Panel behaviour based on event type.
Hook files are located in the /home/midnightstreamer/iptv_midnight_streamer/wwwdir/application/hooks directory and have to be prefixed by the custom_ keyword.
The add_hook function is used to register the callback functions.
Syntax
Available Event Types are
The callback functions execution order is defined by the priority parameter.
The callback functions have two array type parameters available for processing, $segments which contains the URL segments from the 3rd segment on and $post array which contains POST data.
For example if we want to call an API on another server while disabling/enabling a Line or MAG Device in our Panel, we can make a hook like this: